Raycasting and the DDA algorithm
Introduction
Raycasting was one of the first things that truly sparked my interest in computer graphics. It’s a perfect blend of math, logic, and visual creativity — just enough trigonometry to be interesting, and approachable with basic to intermediate programming skills. If you’ve ever built a game loop or tinkered with drawing pixels to the screen, you already have most of what you need to dive in.
First a bit of history
Raycasting emerged in the early days of 3D graphics as a computationally efficient technique for rendering 3D environments from a 2D map. It gained popularity in the nineties, most notably through id Software’s Wolfenstein 3D, which showcased how simple calculations could create immersive first-person experiences. A key component of raycasting is the Digital Differential Analyzer (DDA) algorithm, originally developed for line drawing in computer graphics. While raycasting was groundbreaking in its time, it comes with significant limitations for modern 3D first-person games. Since it renders scenes based on a 2D map, raycasting can’t represent complex 3D structures like overlapping rooms, varying floor heights, or dynamic objects with real depth. It also lacks support for advanced lighting, true perspective projection, and detailed geometry, which are essential for realism. Additionally, scaling sprites for enemies or objects can look distorted at close range. Notably, id Software’s next project, Doom, abandoned the DDA-based raycasting approach in favor of a more flexible and powerful engine.
Understanding Raycasting with DDA
What is Raycasting
Imagine standing in a dark maze with a flashlight. You shine the beam straight ahead, and wherever the light hits a wall, you stop. Now, imagine doing this not just once, but hundreds of times, each beam pointing in a slightly different direction.
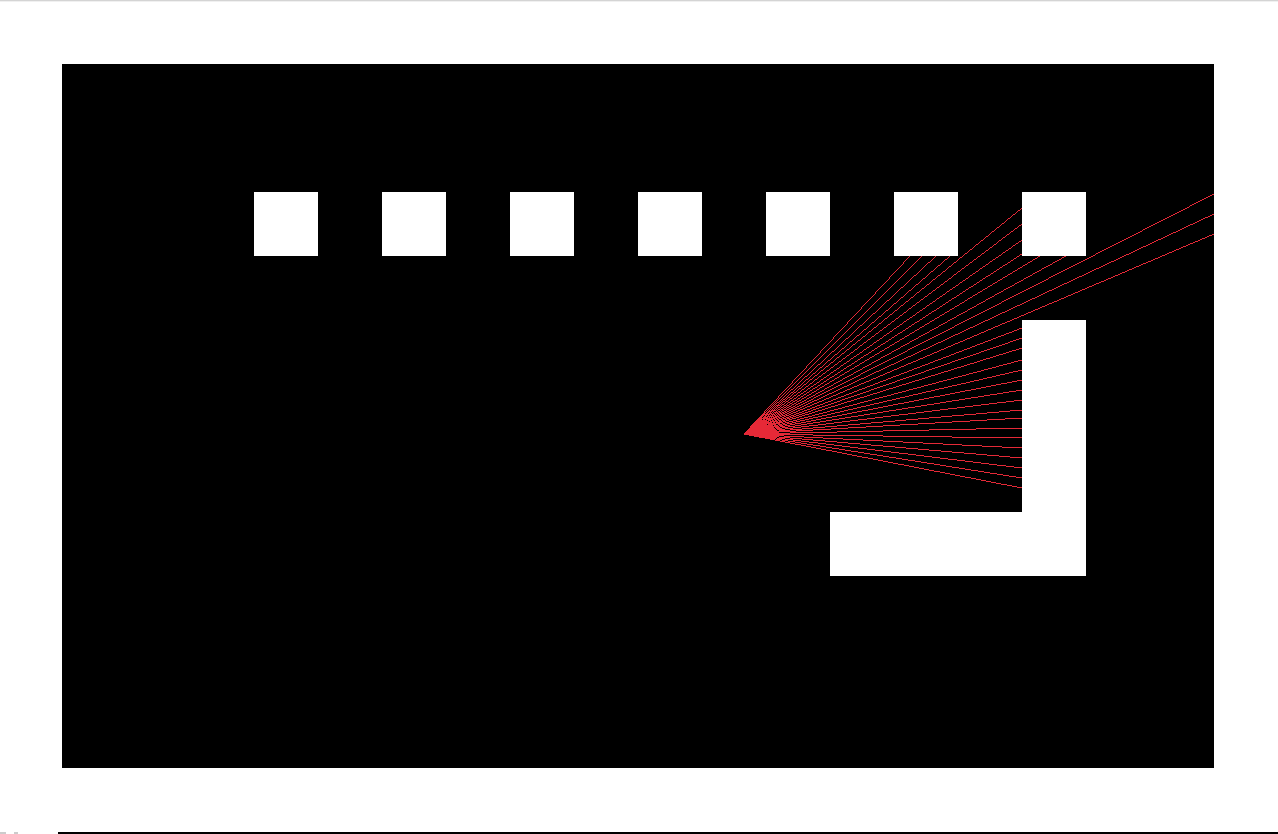
This process of sending out “beams” or rays from a specific point to detect objects in a space is what we call raycasting. This technique can be used to figure out what parts of a virtual world are visible from a particular point of view—like the eyes of a player in a game. Each ray tells us how far away something is, what direction it is in, and whether it’s a wall, floor, or object. That’s why raycasting became popular in early 3D video games, because it was a really clever way to simulate the 3D world by using a lightweight computation technique.
But, how do we actually understand WHERE those rays hit walls?
The DDA Algorithm
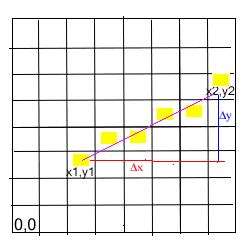
DDA stands for Digital Differential Analyzer. Basically it is a method that we can use to walk along a line on a grid, one small step at a time, until you hit something.
Picture the game world as a big grid made of square tiles. Each of these tiles can be either empty (it’s walkable) or a wall. The player stays on the grid and casts a ray at a specific angle. After the ray has been cast, you can walk along the line, tile by tile, until you hit a wall.
What DDA does is that it breaks down the ray into x and y steps. At each step it checks if it hit a wall. If not, it takes another step, and another, and another. Until—bam—it finds a wall!
From casted rays to projected walls
Now that we know how to compute where rays hit the walls, we can start thinking about how to project those walls into a 3D-like view.
I won’t dive too deep into the tricky trigonometry behind it — there are plenty of fantastic articles out there that explain the math in detail (see footnotes!).
The core idea is this: given the distance from the player to the wall hit by a ray, we can figure out the height of that wall as it should appear in our fake 3D perspective. Let’s break that down a bit.
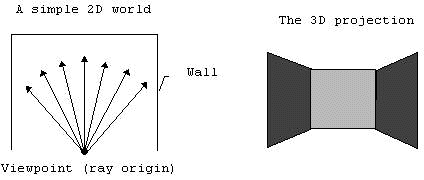
Think back to the dark maze metaphor we used earlier. The closer a wall is when we shine a flashlight toward it, the shorter the beam will be. And the closer the wall is, the taller it looks to us. That’s basically how perspective works — things that are closer appear larger.
By applying this logic to each ray we cast, we end up with several wall slices, each with a different height depending on the distance. If we draw those slices as vertical rectangles side-by-side on the screen, they combine into something that actually looks like a 3D room. Pretty neat, right?
Casting Rays in Code
So, how do we actually implement all of this?
In my implementation, I wrote a function called castRay that does exactly what we’ve been talking about — it simulates a ray being fired from the player, and it finds where that ray hits a wall in the map grid. The way it works is pretty methodical, and it follows the DDA algorithm step-by-step.
First, we take in a rayAngle, normalize it, and determine which direction the ray is facing:
rayAngle = normalizeAngle(rayAngle);

int isRayFacingDown = rayAngle > 0 && rayAngle < PI;
int isRayFacingUp = !isRayFacingDown;
int isRayFacingRight = rayAngle < 0.5 * PI || rayAngle > 1.5 * PI;
int isRayFacingLeft = !isRayFacingRight;
This helps us figure out how to move through the grid, and more importantly, how to offset the intersection checks to avoid bugs when the ray is exactly on a tile edge.
Checking Horizontal Intersections
Next, we calculate where the ray first intersects a horizontal grid line and how it steps from one horizontal line to the next:
yintercept = floor(player.y / TILE_SIZE) * TILE_SIZE;
yintercept += isRayFacingDown ? TILE_SIZE : 0;

xintercept = player.x + (yintercept - player.y) / tan(rayAngle);

ystep = TILE_SIZE * (isRayFacingUp ? -1 : 1);
xstep = TILE_SIZE / tan(rayAngle);
xstep *= (isRayFacingLeft && xstep > 0) ? -1 : 1;
xstep *= (isRayFacingRight && xstep < 0) ? -1 : 1;
Then we enter a loop, stepping ray-by-ray until we hit a wall or go out of bounds:
while (nextHorizontalIntersectionX >= 0 && nextHorizontalIntersectionX <= WINDOW_WIDTH &&
       nextHorizontalIntersectionY >= 0 && nextHorizontalIntersectionY <= WINDOW_HEIGHT) {

    if (isWallAt(nextHorizontalIntersectionX, nextHorizontalIntersectionY - (isRayFacingUp ? 1 : 0))) {
        foundHorizontalWallHit = TRUE;
        horizontalWallHitX = nextHorizontalIntersectionX;
        horizontalWallHitY = nextHorizontalIntersectionY;
        break;
    } else {
        nextHorizontalIntersectionX += xstep;
        nextHorizontalIntersectionY += ystep;
    }
}
Vertical Intersections Work the Same Way
We repeat the same logic, but stepping through vertical grid lines this time:
xintercept = floor(player.x / TILE_SIZE) * TILE_SIZE;
xintercept += isRayFacingRight ? TILE_SIZE : 0;
yintercept = player.y + (xintercept - player.x) * tan(rayAngle);
… and again:
while (nextVerticalIntersectionX >= 0 && nextVerticalIntersectionX <= WINDOW_WIDTH &&
       nextVerticalIntersectionY >= 0 && nextVerticalIntersectionY <= WINDOW_HEIGHT) {

    if (isWallAt(nextVerticalIntersectionX - (isRayFacingLeft ? 1 : 0), nextVerticalIntersectionY)) {
        foundVerticalWallHit = TRUE;
        verticalWallHitX = nextVerticalIntersectionX;
        verticalWallHitY = nextVerticalIntersectionY;
        break;
    } else {
        nextVerticalIntersectionX += xstep;
        nextVerticalIntersectionY += ystep;
    }
}
Choosing the Closest Hit
Once both intersection checks are done, we simply compare their distances:
float horizontalIntersectionDistance = foundHorizontalWallHit
    ? distanceBetweenTwoPoints(player.x, player.y, horizontalWallHitX, horizontalWallHitY)
    : INT_MAX;

float verticalIntersectionDistance = foundVerticalWallHit
    ? distanceBetweenTwoPoints(player.x, player.y, verticalWallHitX, verticalWallHitY)
    : INT_MAX;

float distance = fmin(horizontalIntersectionDistance, verticalIntersectionDistance);
Finally we store each of these informations inside rays array for each considered ray.
rays[rayIndex].distance = distance;
rays[rayIndex].wallHitX = wallHitX;
rays[rayIndex].wallHitY = wallHitY;
rays[rayIndex].wasHitVertical = wasHitVertical;
rays[rayIndex].rayAngle = rayAngle;
Projecting Walls on the Screen
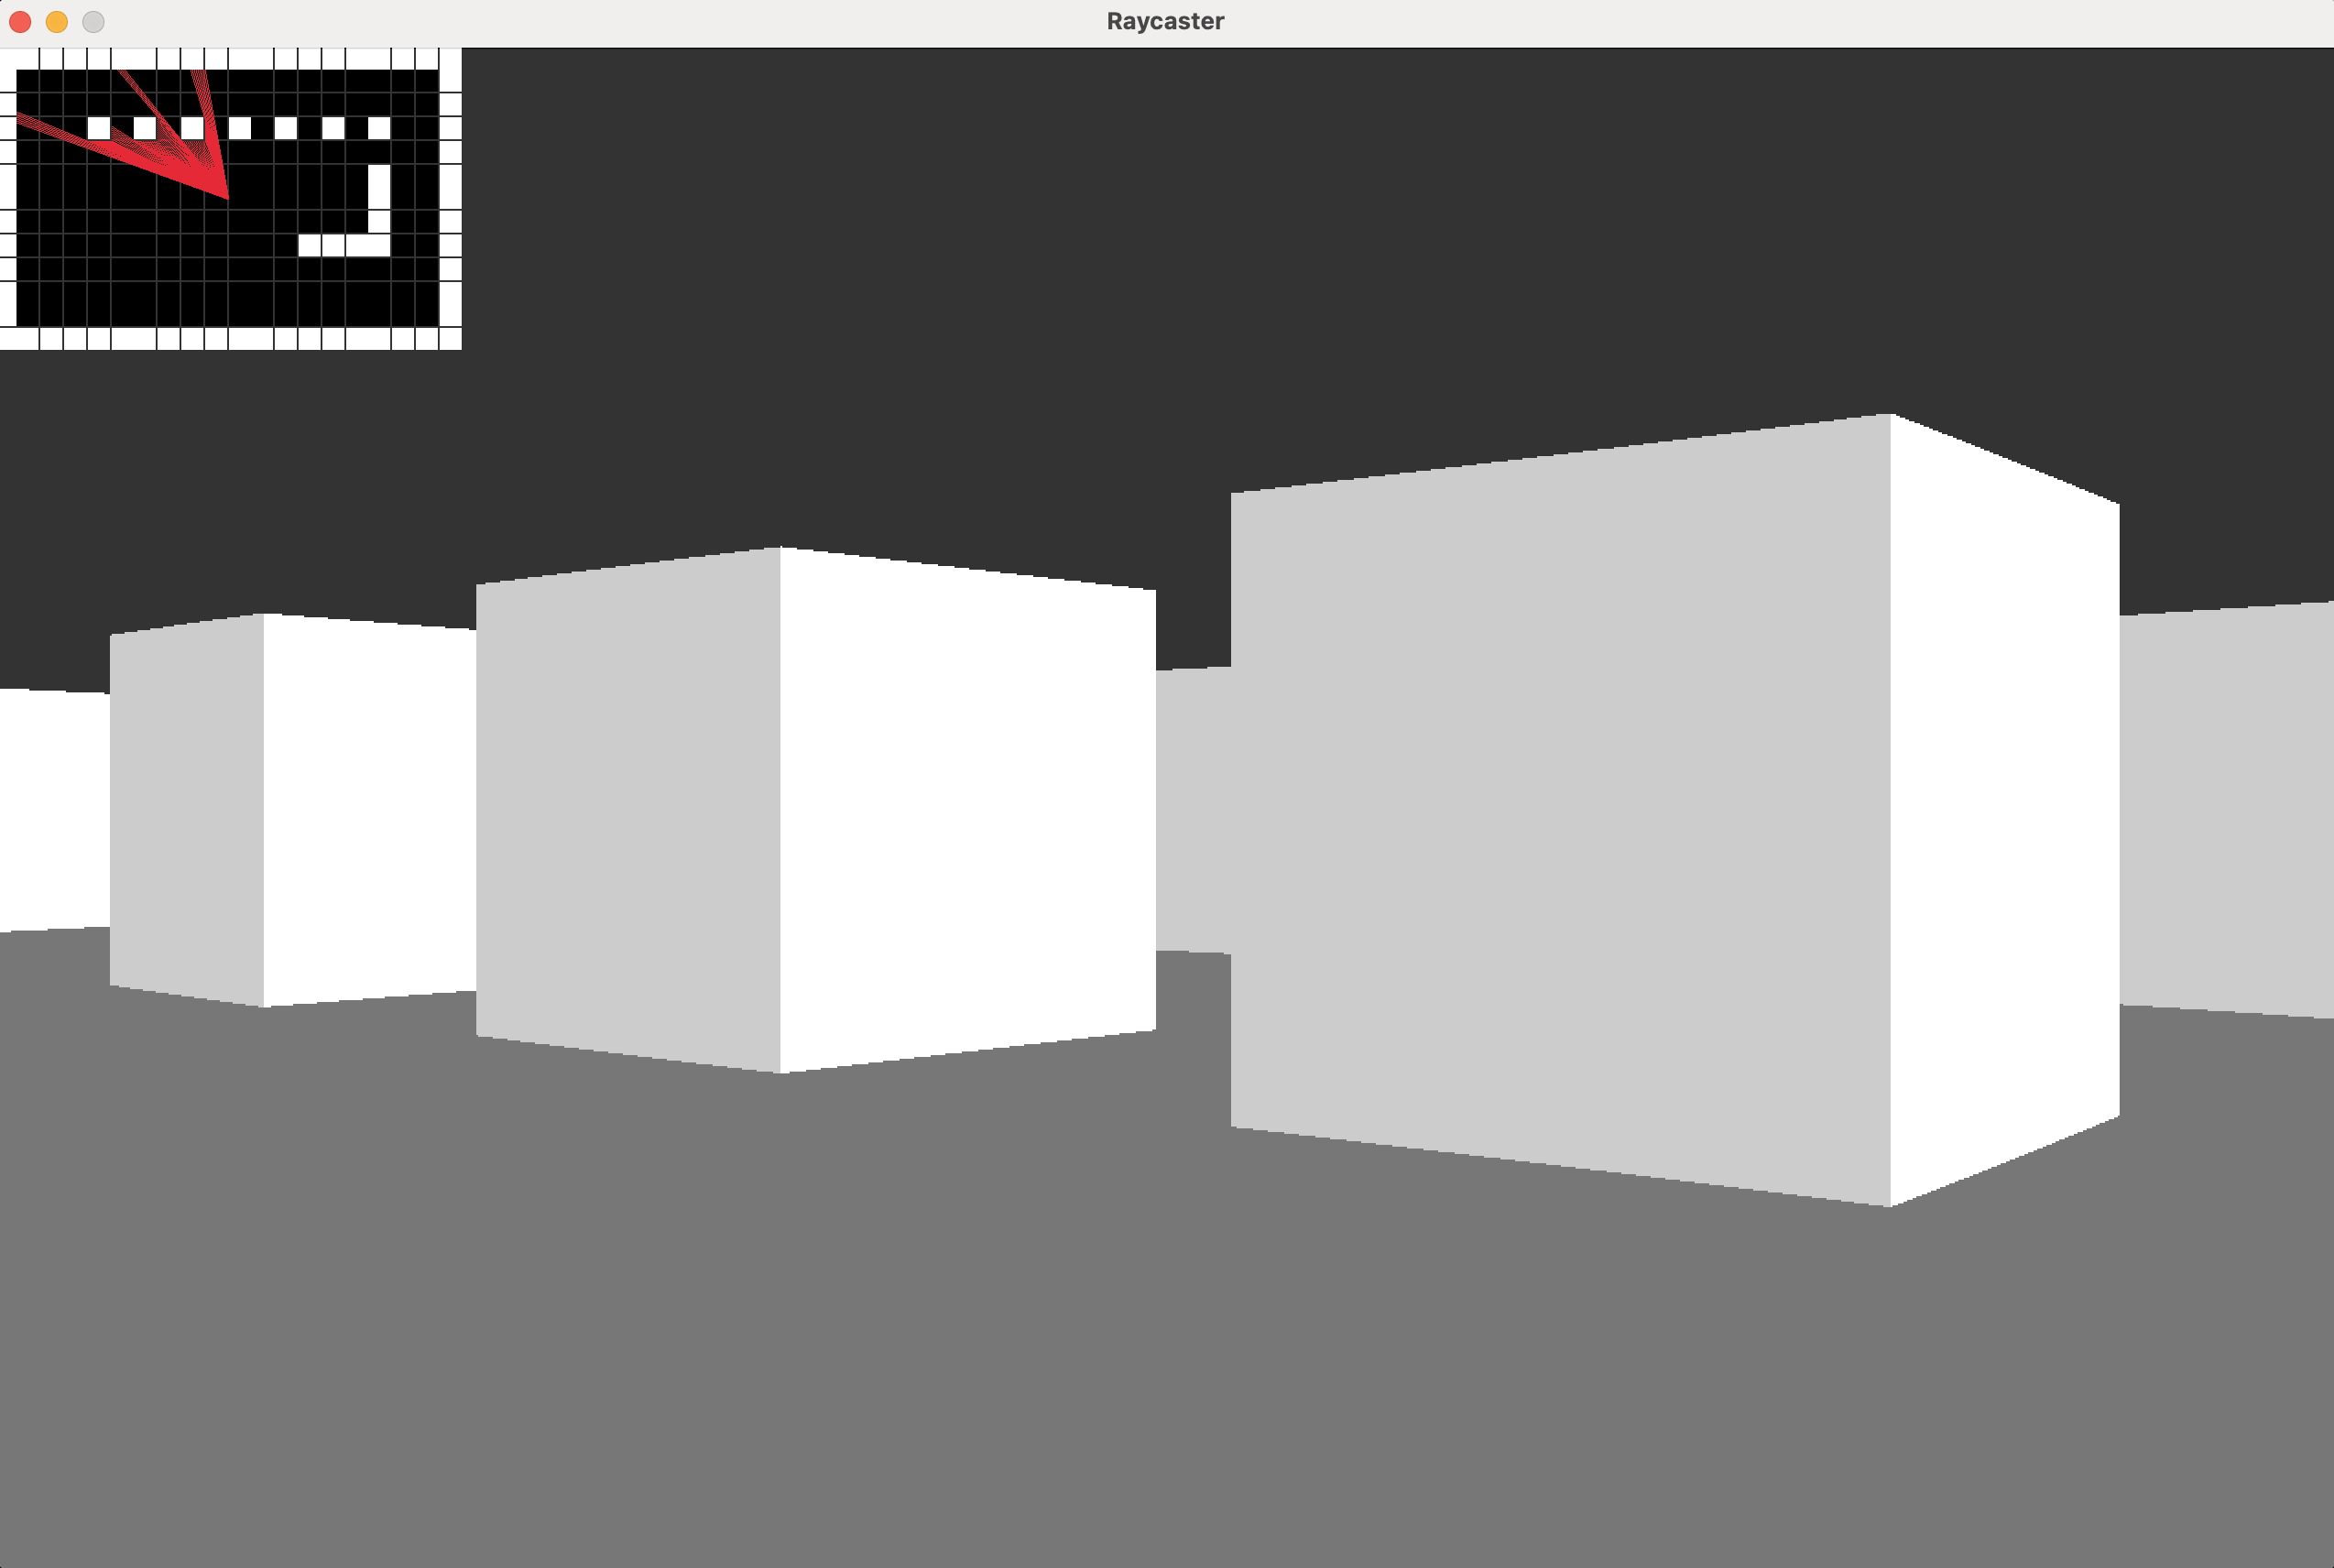
Now that each ray has found its wall hit point, it’s time to draw something on the screen — and this is where the illusion of 3D really kicks in.
We take the information stored in the rays[] array and use it to render vertical wall strips, where each strip represents a slice of the wall that was hit by a ray. This happens in the generate3DWallProjection() function.
Let’s walk through what it does.
Step 1: Distance Correction
We correct the raw distance to avoid the fish-eye effect, which occurs because rays at the edges of the FOV travel farther than the central ones:
float normalizedDistance = rays[i].distance * cos(rays[i].rayAngle - player.rotationAngle);This “squashes” diagonal distortion and makes all rays behave as if they were cast straight ahead.
Step 2: Project Wall Height
We then calculate how tall the wall should appear, based on its distance from the player. Closer walls will appear taller, and farther ones shorter — just like in real life:
float distanceFromProjectionPlane = (WINDOW_WIDTH / 2) / tan(FOV_ANGLE / 2);
float projectedWallHeight = (TILE_SIZE / normalizedDistance) * distanceFromProjectionPlane;
This mimics how light and perspective scale objects in the real world.
Step 3: Determine Vertical Strip Start/End
Once we know the height of the wall on screen, we can compute where it should start and end vertically:
int wallStripHeight = projectedWallHeight;
int wallStartPixel = (WINDOW_HEIGHT / 2) - (wallStripHeight / 2);
wallStartPixel = wallStartPixel < 0 ? 0 : wallStartPixel;

int wallEndPixel = wallStartPixel + wallStripHeight;
wallEndPixel = wallEndPixel > WINDOW_HEIGHT ? WINDOW_HEIGHT : wallEndPixel;
This centers the wall strip vertically in the middle of the screen.
Step 4: Draw Sky, Wall, and Floor
Now comes the final touch — drawing! For each column (or strip), we fill in three parts:
- Sky: everything above the wall
- Wall: the vertical slice of the actual wall
- Floor: everything below the wall
for (int y = 0; y < wallStartPixel; y++) {
	colorBuffer.Buffer[WINDOW_WIDTH * y + i] = 0xFF333333; // Sky
}

for (int y = wallStartPixel; y < wallEndPixel; y++) {
	colorBuffer.Buffer[WINDOW_WIDTH * y + i] = rays[i].wasHitVertical ? 0xFFFFFFFF : 0xFFCCCCCC; // Wall
}

for (int y = wallEndPixel; y < WINDOW_HEIGHT; y++) {
	colorBuffer.Buffer[WINDOW_WIDTH * y + i] = 0xFF777777; // Floor
}
You might notice that walls hit vertically are drawn a bit darker or lighter. That’s a simple shading trick to add depth and help distinguish wall orientation.
Wrapping It All Together
At this point, you’ve seen how a simple idea — casting rays from a point and checking for wall hits — can create the illusion of a 3D world. It’s a beautiful demonstration of how geometry, math, and a bit of trickery can deliver immersive visuals with relatively minimal computational cost.
What’s most exciting is that everything we’ve built here — from DDA traversal to the projection math — is fully under your control. You’re not relying on a game engine or graphics API to fake it for you.
Possible Enhancements
If you’re looking for next steps or fun challenges, here are a few ideas to keep your curiosity going:
-
Textured Walls: Instead of flat colors, sample from a bitmap texture based on the hit location for each wall slice.
-
Sprite Rendering: Add enemies or pickups that scale with distance, respecting occlusion behind walls.
-
Field of View Tweaks: Try narrowing or widening the FOV to change the feel of movement.
-
Fog or Lighting Effects: Add distance-based fog or light intensity for dramatic visual depth.
-
Non-90° Walls: For a bigger challenge, experiment with maps that support arbitrary angles — this steps into ray tracing territory!
Final Thoughts
If you’ve followed along this far — hats off to you! You’ve just recreated the core of a 1990s game engine from scratch. More than that, you’ve unlocked a powerful new lens for thinking about computer graphics. Raycasting is approachable, educational, and just plain fun.
Checkout the full implementation on my GitHub Page